


|
|
Fishermen's Journal |

Basic Reel Maintenance
and Reel Schematics for Avet and Penn
by Chark (a.k.a. - Mark Smith)
| If you want to get long life (essentially a lifetime of service) from your
quality built Penn fishing reels some basic maintenance is essential. If you upgrade your
Penn with Accurate or Tiburon components, you'll find that basic yearly maintenance is
even more critical to the long term enjoyment of your reel. With a little time spent
performing some simple servicing you'll find your gear performs better, and will give you
a lifetime's worth of service. If you've lost the reel diagram and parts list that came
with your reel, don't worry. At the bottom of the page you'll find links to
schematic diagrams, and a link directly to a page produced by Penn that allows
you to view (using Adobe Acrobate -w/free download) diagrams for all their reels.
One thing that I've begun doing is taking my hard use reels at least once a year. I replace the drags, and re-apply grease to critical areas of the reels. I didn't always act so responsibly, and almost ruined a reel with an expensive Accurate sideplate upgrade a couple years ago. Several components froze up due to corrosion, simply because I didn't take the time to perform this simple service. Thanks to the wonders of LimeAway, I was able to free up the parts, and save the sideplate and bearings, but I had to replace several components. This was totally my fault, and an easy problem to prevent. So, here's a suggestion for keeping your reels in top condition.
|
|
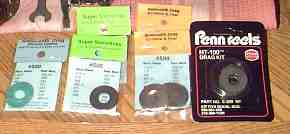 Next up you'll need to
figure out which washers you want to use for your drag replacement. There are several
alternatives available. Smooothy offers a couple options a zinc / fiber material - the
same as you'd find on an International, and a green silicone impregnated fiber material.
Penn offers an economical and well proven drag and drag plus steel washer kit as well.
This time I decided to upgrade my 4/0 narrow frame yellowtail special with the Silicone
Smooothies (on the left). I've found that these drag washers are smoother than the
standard drags, and are very reliable. I've used the super smoothies on my 500's, and
trust these drags a great deal as well. Next up you'll need to
figure out which washers you want to use for your drag replacement. There are several
alternatives available. Smooothy offers a couple options a zinc / fiber material - the
same as you'd find on an International, and a green silicone impregnated fiber material.
Penn offers an economical and well proven drag and drag plus steel washer kit as well.
This time I decided to upgrade my 4/0 narrow frame yellowtail special with the Silicone
Smooothies (on the left). I've found that these drag washers are smoother than the
standard drags, and are very reliable. I've used the super smoothies on my 500's, and
trust these drags a great deal as well. |
|
|
|
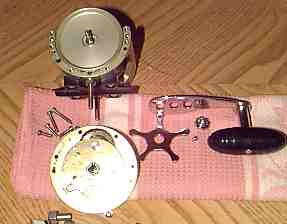 Once you've removed the
six screws securing the sideplate to the frame, you can proceed to take apart the rest of
the reel, exposing the drags and gears. There are four screws behind the star drag which
secure the bridge assembly to the sideplate. While carefully keeping pressure on the
bridge, unscrew the bridge from the sideplate. Once you've removed the
six screws securing the sideplate to the frame, you can proceed to take apart the rest of
the reel, exposing the drags and gears. There are four screws behind the star drag which
secure the bridge assembly to the sideplate. While carefully keeping pressure on the
bridge, unscrew the bridge from the sideplate. |
|
|
|
 I like to spray some WD40
on a towel and polish the reel's components at this time. I like to spray some WD40
on a towel and polish the reel's components at this time. |
|
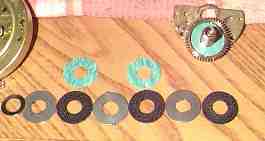 Now, it's an easy job to
replace the drag washers, keeping the sequence the same as when you took the parts out of
the reel. Do not grease the washers (especially important with Silicon Smoothies). Apply a
small coating of Penn's Reel Lube to the gears and parts that may be exposed to saltwater
and friction. Do not gob on the lube, a very light coating is preferable. In fact, you'll
only mess things off if you do lube your drag washers, or load up grease on the gears.
You'll end up holding the salts in suspension with the grease, increasing the hazards of
corrosion. Now, it's an easy job to
replace the drag washers, keeping the sequence the same as when you took the parts out of
the reel. Do not grease the washers (especially important with Silicon Smoothies). Apply a
small coating of Penn's Reel Lube to the gears and parts that may be exposed to saltwater
and friction. Do not gob on the lube, a very light coating is preferable. In fact, you'll
only mess things off if you do lube your drag washers, or load up grease on the gears.
You'll end up holding the salts in suspension with the grease, increasing the hazards of
corrosion. |
|
 Finally,
the last job is to re-assemble your reel. You may have a little trouble with the eccentric
jack (a small component that works with the mechanism which puts the reel in and out of
freespool). Also the anti reverse mechanism may cause you a little frustration, but it's
not impossible to get things back in order - so don't give up. To help you further, I've
included links to schematics for several popular Penn reels below. Prior to securing the
sideplate to frame, and the gear mechanism to the sideplate, apply a liberal coating of
blue grease or Penn Reel Lube to all screw holes. This will prevent corrosion from
attacking your reel. This is especially necessary when you do upgrade components to fancy
aluminum frames and sideplates. You've got dissimilar metals coming in contact, combine
that with a bit of saltwater and you have the potential for problems. Finally,
the last job is to re-assemble your reel. You may have a little trouble with the eccentric
jack (a small component that works with the mechanism which puts the reel in and out of
freespool). Also the anti reverse mechanism may cause you a little frustration, but it's
not impossible to get things back in order - so don't give up. To help you further, I've
included links to schematics for several popular Penn reels below. Prior to securing the
sideplate to frame, and the gear mechanism to the sideplate, apply a liberal coating of
blue grease or Penn Reel Lube to all screw holes. This will prevent corrosion from
attacking your reel. This is especially necessary when you do upgrade components to fancy
aluminum frames and sideplates. You've got dissimilar metals coming in contact, combine
that with a bit of saltwater and you have the potential for problems. |
|
 And since I brought
up corrosion, just take a look at this sucker! AgentBlack a frequent contributor recently
made a pretty good buy on a couple Penn 117's. The winches are big, but as we found out,
at least one of the reels was in terrible shape. The corrosion of the gears resulted in
the side panels being coated with a significant layer of rust. The damage was terminal for
the heavy duty gears, requiring a pretty expensive overhaul, with lots of new parts. If
the original owner had taken the least amount of care, and opened up the reels yearly the
parts would have lasted a lifetime. But, on the other hand, once we finish up with this
beast the reel's owner will have a heck of a rock cod rig. And since I brought
up corrosion, just take a look at this sucker! AgentBlack a frequent contributor recently
made a pretty good buy on a couple Penn 117's. The winches are big, but as we found out,
at least one of the reels was in terrible shape. The corrosion of the gears resulted in
the side panels being coated with a significant layer of rust. The damage was terminal for
the heavy duty gears, requiring a pretty expensive overhaul, with lots of new parts. If
the original owner had taken the least amount of care, and opened up the reels yearly the
parts would have lasted a lifetime. But, on the other hand, once we finish up with this
beast the reel's owner will have a heck of a rock cod rig.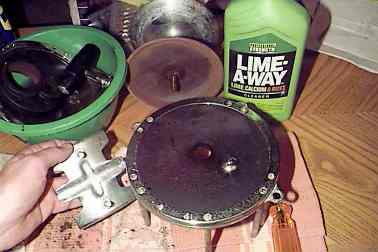 |
|
| I hope this brief guide helps motivate you to take on this job. You'll actually enjoy taking your reel apart, learn a bit about what makes some reels better than others, and get better use from your gear. If I can be of any help finding schematics or parts please feel free to send me a note. | |
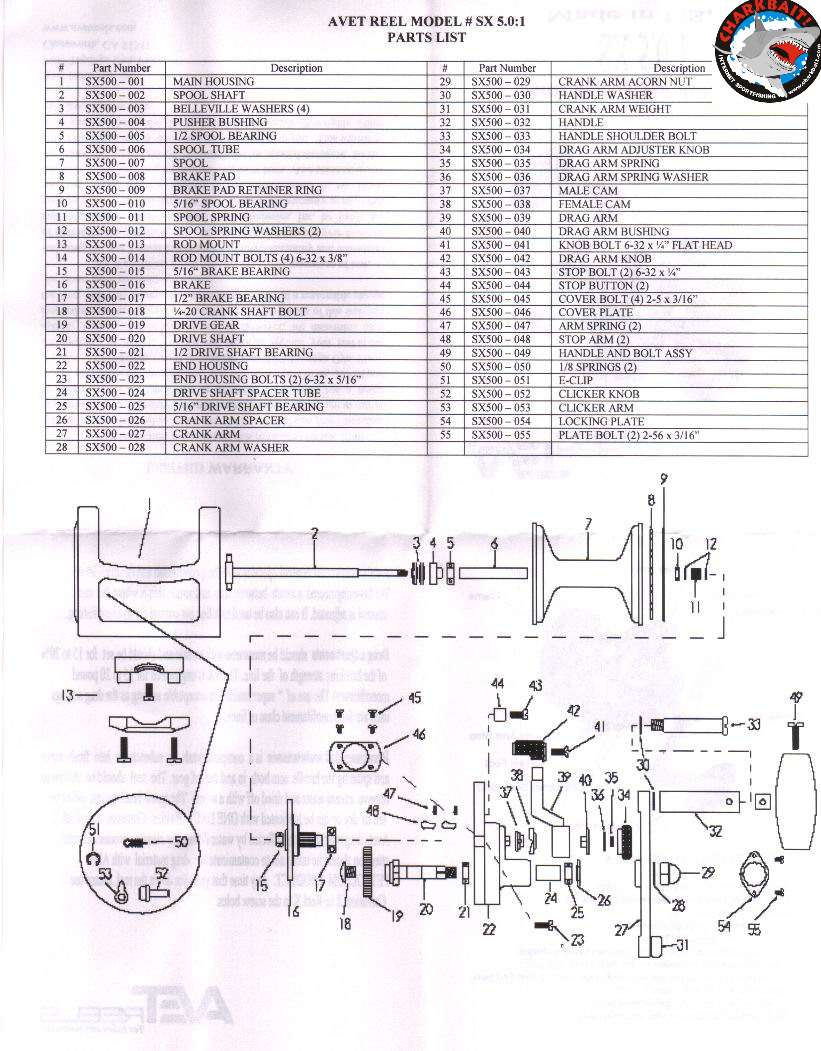
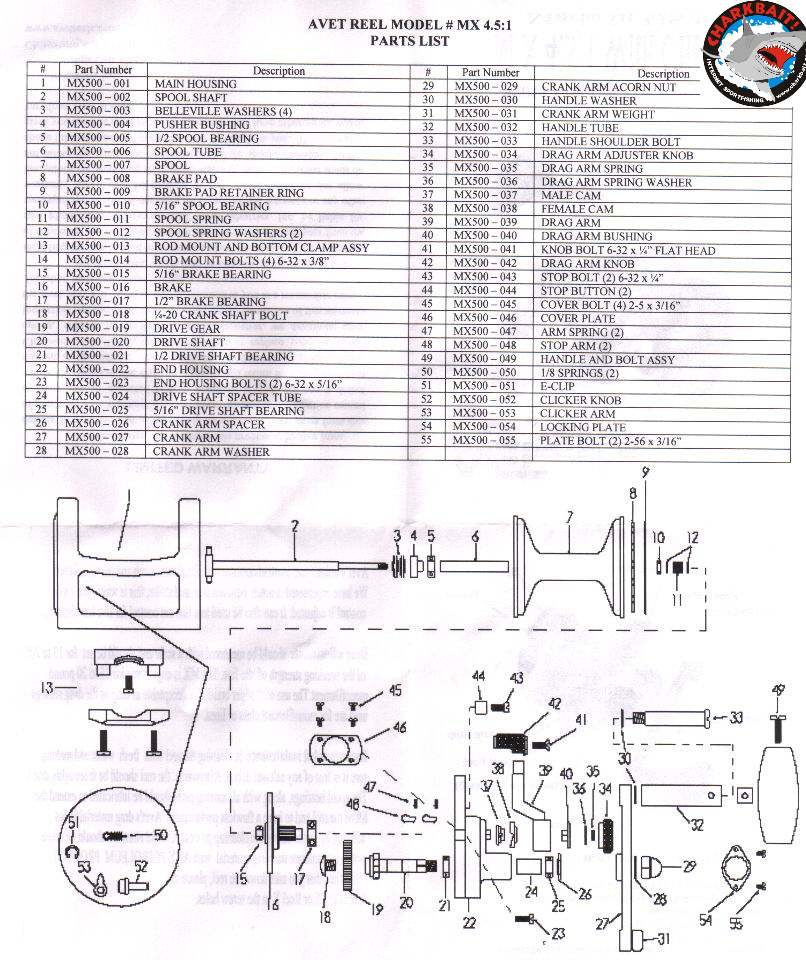
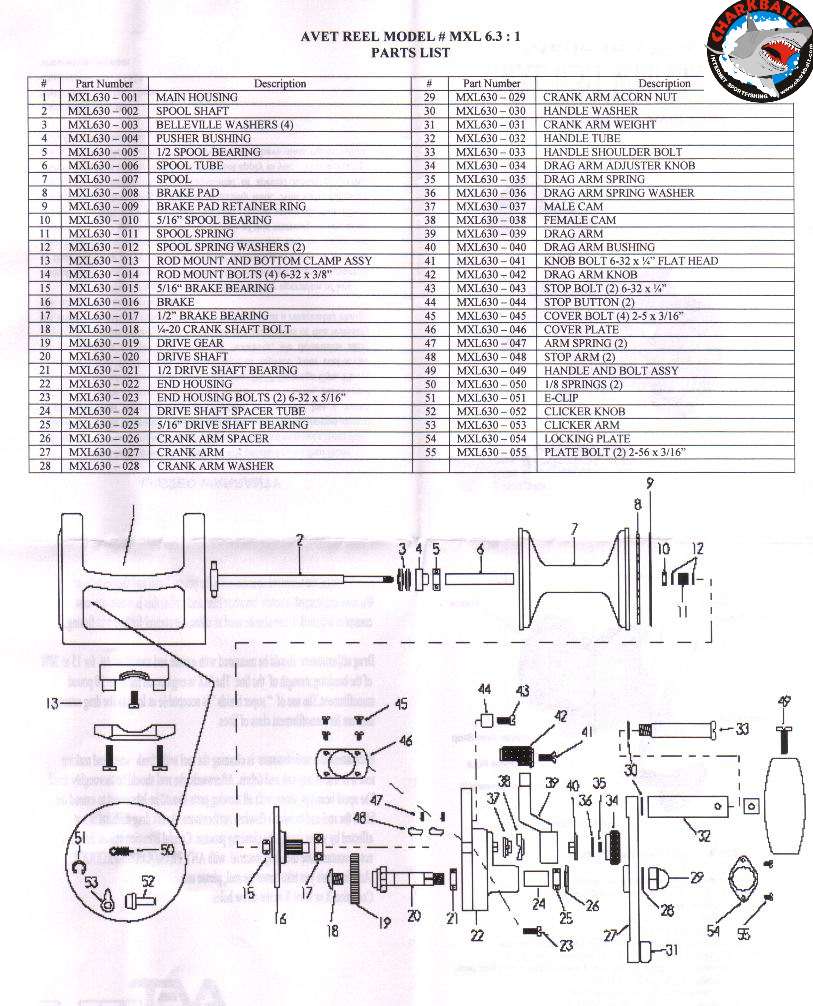
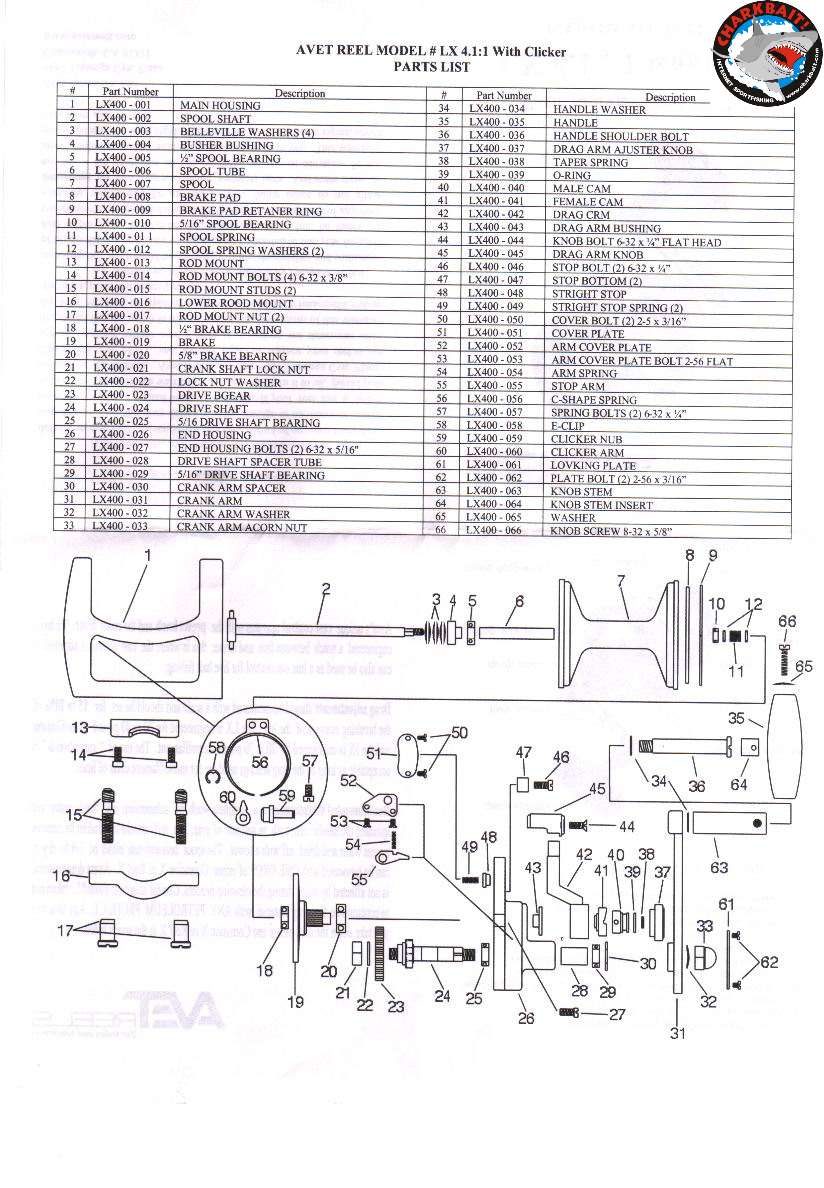
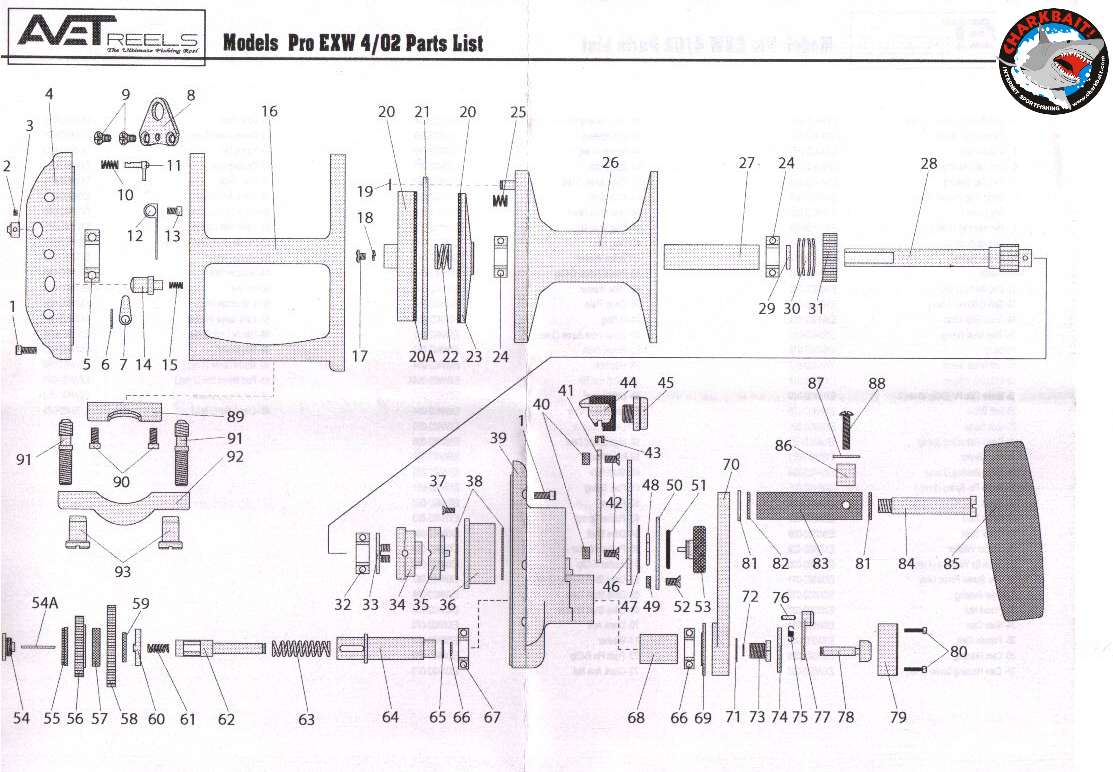
| Penn Schematics:
500,
113, and
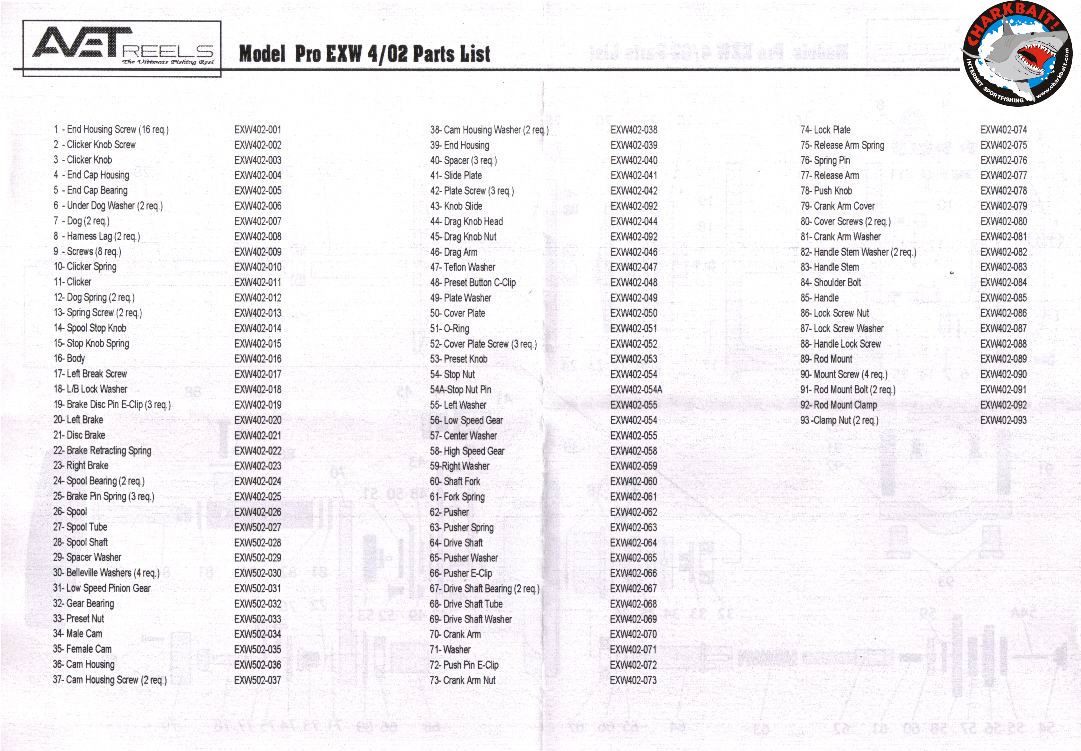
114 series Avet Schematics: SX, MX 4.5:1, MX 6:1, LX/JX 4:1, EX diagram, EX parts list |
|
| You too can get published right here at CharkBait. Have an
idea other boaters or fishermen could use, some experience to share, a great trip to
report? Well, get typing, include some pics, and if your article is selected for
publication you'll receive a free CharkChirt and the appreciation of other fishermen.
|
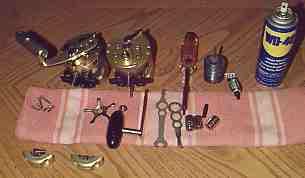 Required supplies for the task of
lubricating your reel and replacing drag washers include: Penn Reel Lube, Blue Grease,
Lime Away (if necessary) and WD40 (optional), and some new drag washers. A screw driver
and sockets are nice to have, but the wrench and driver tool supplied by Penn with your
reel is fully adequate for the job at hand.
Required supplies for the task of
lubricating your reel and replacing drag washers include: Penn Reel Lube, Blue Grease,
Lime Away (if necessary) and WD40 (optional), and some new drag washers. A screw driver
and sockets are nice to have, but the wrench and driver tool supplied by Penn with your
reel is fully adequate for the job at hand. 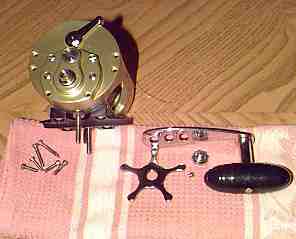 The first thing you'll want to do is
remove the reel's sideplate. To do that, first remove the handle, keeping the parts
together and organized (this is something that is a good habit to get into...). Then,
remove the six screws securing the sideplate to the frame. Some folks like to totally take
down the reel, dis-assembling the other sideplate at this time as well. I prefer to finish
one side, then take care of the other. But, this is personal preference. Either way,
you'll want to re-lubricate both sides.
The first thing you'll want to do is
remove the reel's sideplate. To do that, first remove the handle, keeping the parts
together and organized (this is something that is a good habit to get into...). Then,
remove the six screws securing the sideplate to the frame. Some folks like to totally take
down the reel, dis-assembling the other sideplate at this time as well. I prefer to finish
one side, then take care of the other. But, this is personal preference. Either way,
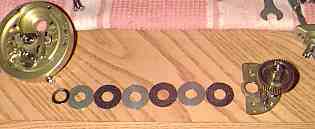
you'll want to re-lubricate both sides. 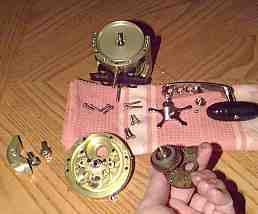 In my hand is the bridge assembly.
This is where your old drags will be found. Very carefully take out the drag washers,
keeping them in order so you'll have an easy time putting them back in proper order. You
should take apart the reels eccentric spring and lever and re-apply a good coating of Reel
Lube or blue grease prior to re-assembly. (This is the lever that engages the reel's gears
taking it out of freespool).
In my hand is the bridge assembly.
This is where your old drags will be found. Very carefully take out the drag washers,
keeping them in order so you'll have an easy time putting them back in proper order. You
should take apart the reels eccentric spring and lever and re-apply a good coating of Reel
Lube or blue grease prior to re-assembly. (This is the lever that engages the reel's gears
taking it out of freespool). 