


|
|
Fishermen's Journal |

Magging an Avet
Or, other reels...
by Walt Galen
|
Magging an Avet JX
Moving to California from the Great Lakes region I found myself researching extensively for my first ocean reel. I wanted quality and value. I also wanted a general all around reel that I could make do for a variety of conditions and targets. I eventually purchased a Avet JX from the Charkster that I chose as a reel to cover 95% of any situation I might encounter on any 2 day trip out of southern California.. I can stuff 400 + yds of 30lb. Spectra with appropriate fluorocarbon leader on this reel. Its bolted to a 7 ft. 15-40 LB class graphite rod, I could not be happier. Well, yes I could be happier. This wonder reel has excellent free spool. While this feature is desirable for fly lining and indicates an exceptionally well engineered reel, this amazing feature requires a highly educated thumb when casting for maximum distance. Casting with 75% effort presents little problem for skilled anglers . Its when you really crank in the power to get that maximum distance that problems arise. Lets redefine “problems” as “backlash extrodinare”. Yes, it can be minimized but the thumb control required negates a lot of the distance potential for the extra power exerted. I needed a solution to this annoyance. After an extensive net search of long distance casting I came across some East Coast sites where shore fishermen were MAGGING their reels for max distance when surf casting . I also learned that Magging a reel is not rocket science and is easy to do. Magging is nothing new. It has been around for some time and is used today by various manufactures in selected models. Why magging works is a result of the application of Lenz’s Law. Basically, when a rotating metallic object (your reel spool) is within a magnetic field an opposing field is induced into the rotating metal which counteracts the field of the stationary magnet. Consequently resistance is induced into the spool slowing it down. The strength of this resistance is proportional to the rotational speed of the spool and the strength of the magnet. Thus the maximum amount of resistance is generated at maximum spool speed and is viturelally non-existant at slow rotational speeds. Backlashes are generated when the spool speed exceeds the speed required to feed line out to the object that has been cast. Magging stops the backlash because it applies spool resistance when it is needed most, at maximum spool speed. The following are detailed instructions on magging a reel. I will outline what I did to Mag the Avet JX but the basic principal can be applied to any reel that has a metallic spool.. Graphite or composite spools cannot be magged. You will first need a source for magnets. Not your ordinary magnets but the strongest available magnets that you can buy. Neodymium Iron Boron Rare Earth Magnets are the only type to use. Do not substitute. These Rare Earth Magnets are 50 times stronger than standard magnets and their effect can be increased by a factor of 2 to 4 with proper installation. They can be purchased on line at: www.leevalley.com, or phone # 800 871 8158. On the web site go to Hardware then go to Magnets. To properly educate yourself read the “About Rare Earth Magnets” page. It is a must read.
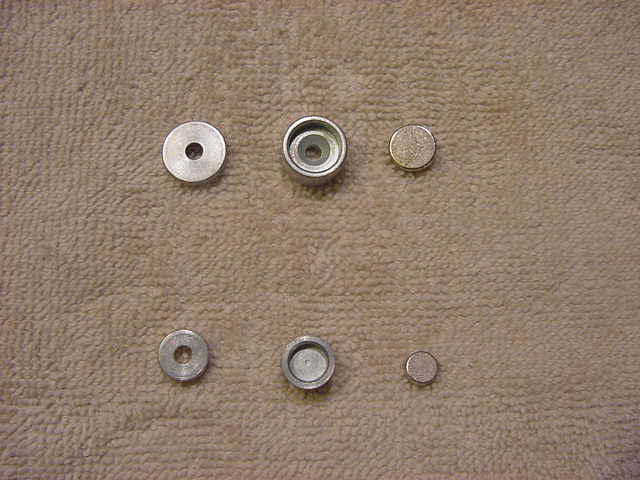
Now, order the following: Minimum of 3 each. #99K31.01 Magnet Ľ” OD - 1/10” Thick #99K32.03 Magnet 3/8” OD - 1/10” Thick #99K32.51 Cup for Ľ” Magnet #99K32.52 Cup for 3/8” Magnet #99K32.61 Washer for Ľ” Magnet #99K32.62 Washer for 3/8” Magnet As you can see on the web site the material is top notch and inexpensive.
This order will give you ample supplies to mag a couple of reels and allows for a blunder or two. You will need some standard air dry hobby glue, even Elmers will work. You will also need a small amount of 2 part epoxy for final attachment of the magnets to the inside of the reel. I like JB Weld, its bullet proof but any Epoxy will do. And some type of degreaser to clean a spot inside the reel so the epoxy will stick to the reel. I use isopropyl alcohol. You might also need access to a small bench grinder to shape the magnet and or magnet base if necessary. You can use a file if you cannot get access to a grinder. And finally some light grease to coat the magnet and its base for salt water corrosion protection. I use Silicone grease but almost any type will suffice. You can always take a Q-Tip and spread some existing grease in your reel over the magnet assembly. There are three ways to mount the magnets. By itself, on a steel washer and inside the correct size steel cup. By itself is one strength value, on a steel washer produces 2X the rated strength of the magnet and inside a steel cup produces 4X the rated strength of the magnet used. Explanation of these values are on the Lee Valley Site. Below shows the Magnets, Flat Washers and Cup Holder for the Ľ” & 3/8” sizes.
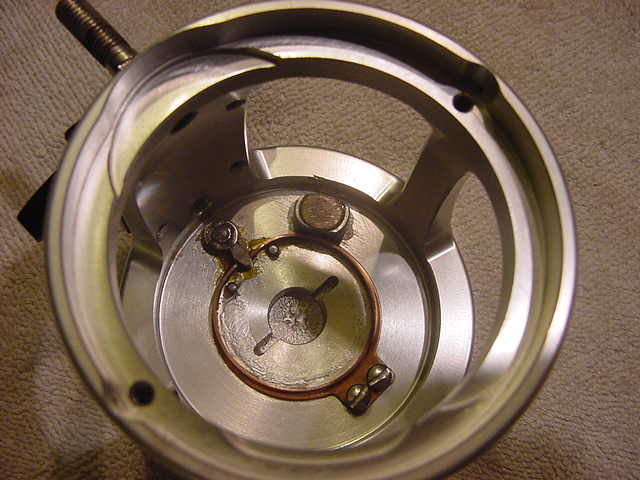
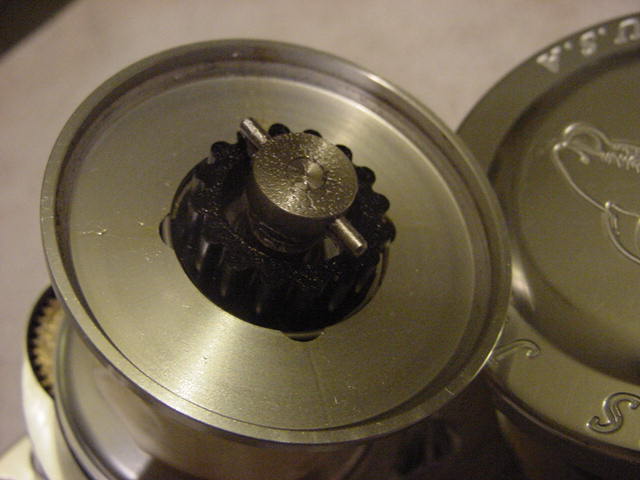
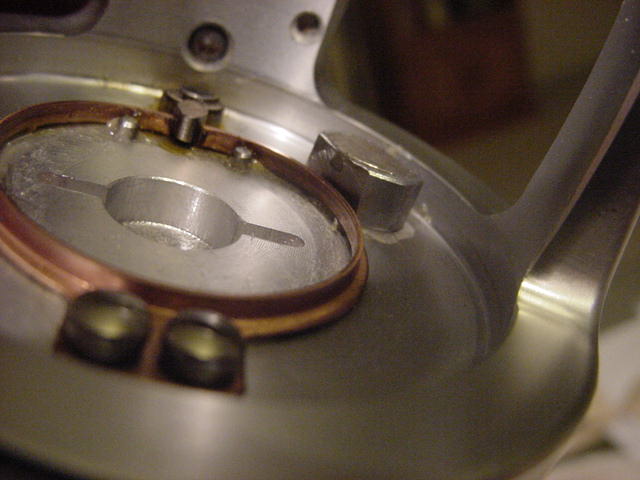
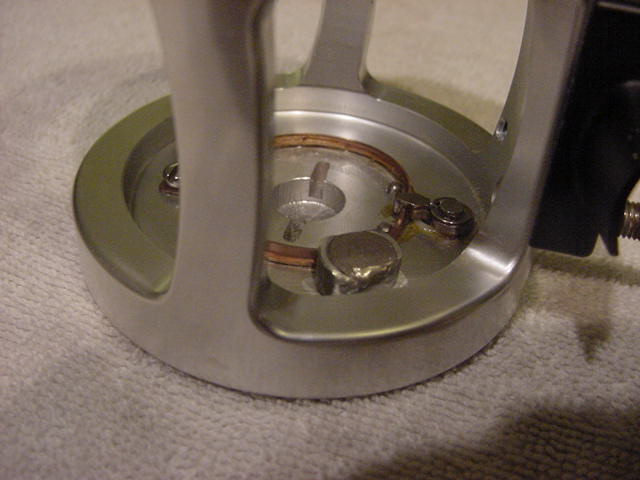
Remove the 2 screws on the handle side of the JX and remove the entire side plate and spool assembly. Real simple. Now the magnet assemble chosen will be attached to the inside of the end housing opposite the handle. Mount the magnet assemble as far out from the center as possible. My JX has a clicker assemble so I mounted the magnet assembly next to the OD of the clicker brass ring. What magnet you use and what steel backing you use depends on trial and error. You will have to experiment with this. Take a look at the pics supplied to get the idea. You install just a magnet, a washer and a magnet or a cup and magnet, just guess to start. 1. With the dismantled reel in the vertical position place the chosen magnet, washer/magnet or cup/magnet combination on the inside back plate as far to the outside as possible then carefully re-assemble the reel, do not screw down yet, now rotate the spool to check for interference between the installed magnet assemble and the rotating spool. Interference will show up as the inability to re-assemble the reel because the magnet assemble is too high or when you rotate the spool it will move the magnet assembly from the original position that you placed it. Do what ever is necessary to create clearance between the magnet and spool. They must not touch. Some suggestions would be to grind down the thickness or the edge of the steel washer or the top edge of the magnet may need clearance. All adjustments must be made to the steel washer or magnet, do not grind on your reel housing or spool. If modification of the magnet is required, and you are using a grinder, be sure to keep the magnet cool by submerging in water every few seconds of grinding as temperatures above 400 deg.F will destroy the strength of the magnet. Now insert the 2 screws and tighten down and re-check for clearance and adjust as necessary. 2. De-grease the end plate and magnet assembly with the alcohol and attach the steel washer or cup with the air dry glue. Let set overnight. The air dry glue is used so it can be removed easily for the next trial magnet set up. Now just set the magnet you have chosen on top of the steel washer or in the cup. Don’t worry it will stay put. Now re-assemble the reel, do not bolt down, just hand assemble and carefully check for spool clearance again between the magnet and the spool.. If it does not clear adjust some thing accordingly. All should be as it was before. 3. Now take a dummy plug or iron, (1-3 oz) remove the hooks, go to the local park and start casting. Lightly at first, keep increasing power until either you have no more power or backlashes start being generated. If you are casting with full power and you are getting no backlash at all you have too much control. You need to reduce the magnetic force until you just start to get a little loose line, not a backlash, once in a few cast. This will be just about right. You can however adjust to your own personal preference. 4. You reduce magnetic force by increasing the distance between the magnet and the spool, going from a cup to a flat washer or no washer, using a smaller magnet or fewer magnets or any combination of the above. If you need to increase the magnetic force decrease the distance between the magnet and the spool, go from a flat washer to a cup installation, install a bigger magnet or more magnets or any combination of the above . ( if you install multiple magnets be sure the polarities are in the same direction) 5. When you have developed a combination you like remove the set up from the reel, scrape off all the air dry glue, clean with alcohol and re-attach with Two part Epoxy. Always re-check for clearance. Finally, coat the entire modification with grease for corrosion protection. Below Pic shows the completed Magging. For the Avet JX I ended up using a 3/8”magnet inside a 3/8 steel cup with about .010” ground off the bottom of the magnet cup and the outside top edge of the cup ground down to clear the outer edge of the spool and the inside of the cup ground to move the entire assembly closer to the center so there would be room for the spool lip.
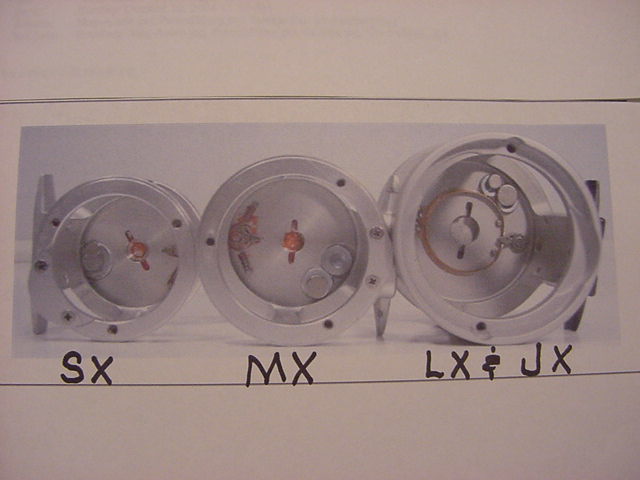
SX, MX and LX/JX (have the same construction.)
Magging my reel has eliminated all backlashing. I can consistently get 60 - 70 yards with my 7 ft. rod. With a good 9-10 ft. rod and a small high quality reel you might realistically expect to get 100 yds slinging iron.
Some thoughts on backlashes: I use 30lb Spectra line with about 4-6ft. of Fluorocarbon leader (15 to 40 lb.) this combo works great, I do not want any back lashes. Back lashes and Spectra are mortal enemies. The no stretch quality of spectra causes extreme weak spots in the line where the back lash snags up the line and makes a birds nest. This snagging in the Spectra line reduces the test by about half, I have even had the Spectra break when backlashed. You do not want to get a backlash in your Spectra. If you do get a good backlash you might want to cut that section of line out. A lot of guys use up to a 100yd top shot of mono which eliminates this issue.
Magging your reel can provide great benefits. Your reel will free line as before and give you the confidence to power cast when necessary.
Try it you will like it.
Walt yessokk@msn.com
|
|
| You too can get published right here at CharkBait. Have an
idea other boaters or fishermen could use, some experience to share, a great trip to
report? Well, get typing, include some pics, and if your article is selected for
publication you'll receive a free CharkChirt and the appreciation of other fishermen.
|